You were told to start using WordPress because it was simple.
You were recommended WooCommerce as the solution of choice for eCommerce for its price, options, and integration with WordPress.
While this is great, a fair bit of setup is still involved with creating a WordPress eCommerce website. Building the pages is one thing, but creating the products can be more difficult. There are a lot of things to consider.
Hopefully, the following tutorial will provide insight into what type of product you need to create with WooCommerce and how to add those products to your site. See this post on WooCommerce may be of interest to you as well.
TABLE OF CONTENTS:
- Set up WooCommerce Install
- Creating Attributes in WooCommerce
- Create Terms in WooCommerce
- Basic WooCommerce product creation tips
- Add WooCommerce Product Categories to the Menu
- What type of products am I going to be selling?
- Creating a simple physical product in WooCommerce
- Creating a variable physical product in WooCommerce
- Creating a simple digital product in WooCommerce
- Creating a variable digital product in WooCommerce
- Displaying Products on the Front Page
- Using WooCommerce with Simple Shop
Set up WooCommerce Install
Before we even get to creating the individual products on WooCommerce, let’s make sure that the plugin is installed and running. Once you have downloaded WooCommerce, you can install it by going to Plugins > Add New > Upload.
Activate the plugin upon install and then head to the WooCommerce > Settings (found on the sidebar of the WordPress dashboard).
As far as the steps to make sure your website is setup properly with your PayPal account, you can follow these tips to speed up your website and begin to set up your WooCommerce install. Let’s move on to the meat of this conversation!
Creating Attributes in WooCommerce
If you are unfamiliar with the process of creating products, you will want to trust us and start with creating Attributes.
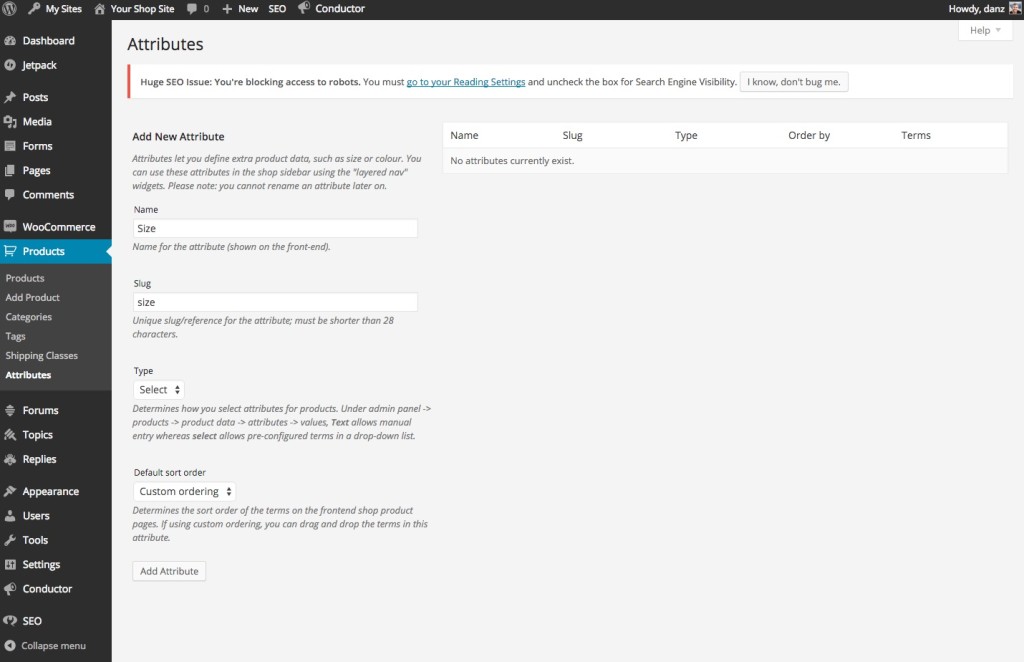
To find and add “Attributes / Terms” to your WooCommerce install, you will want to go to Products > Attributes underneath the WooCommerce item on the sidebar.
Wait. What is a WooCommerce “attribute”?
An attribute is any category that you might have to use going forward to create variation in your product.
You have seen it everywhere. If you go to an online store like Amazon to buy a product, you may have noticed that sometimes shopping is not as simple as clicking an item and going to the cart. Sometimes, you will have multiple options to choose. This is called a variation.
For example, when you buy a movie, it might come in:
- Single Disc
- Director’s Cut
- Super Special Edition 12 disc Collector’s Edition
These are variations. In WooCommerce, we know them as Attributes and Terms.
The Attribute is the overall category where the “Terms” will live.
Here are a couple of real world examples:
- Selling T-Shirts, you would use the “Size” Attribute
- Selling photography, you might use the “Frame” or “Size” Attribute
If your product is going to be variable, you are going to want to add any necessary attributes by going to Products > Attributes and creating them like you would a normal category on WordPress.
Create Terms in WooCommerce
Once you have created the Attributes, you will want to set the terms WITHIN these attributes. You can find Terms by clicking on the little gear box next to your previously created Attribute.

The terms are whatever you make of them.
Using the examples above, you might create terms like “Small, Medium, Large, XL” for t-shirt sizes. For photography frames, you might create terms like “Bamboo, Wood, Steel”.
For a digital product like music downloads, you might set “File Type” as the Attribute and “MP3, AAC, WAV, etc” as the terms within “File Type”.
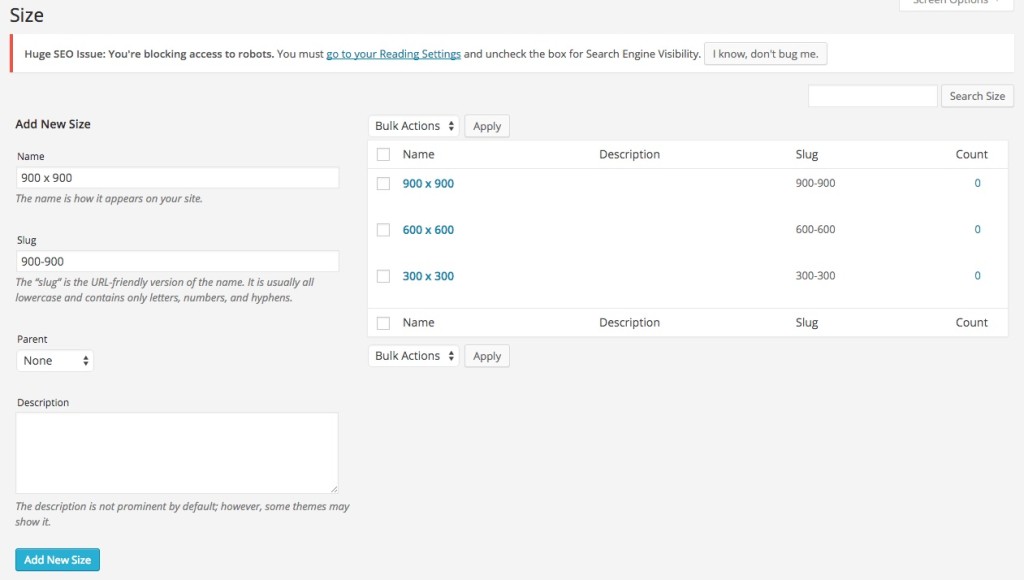
You enter Terms much in the same way you create Attributes, only within each Attribute section.
Basic WooCommerce product creation tips
Now that we have created the Attributes and Terms (if the product is variable), we can move to creating our actual products.
Regardless what type of product you are selling — physical or digital — there are some WooCommerce product creation tips that are the same.
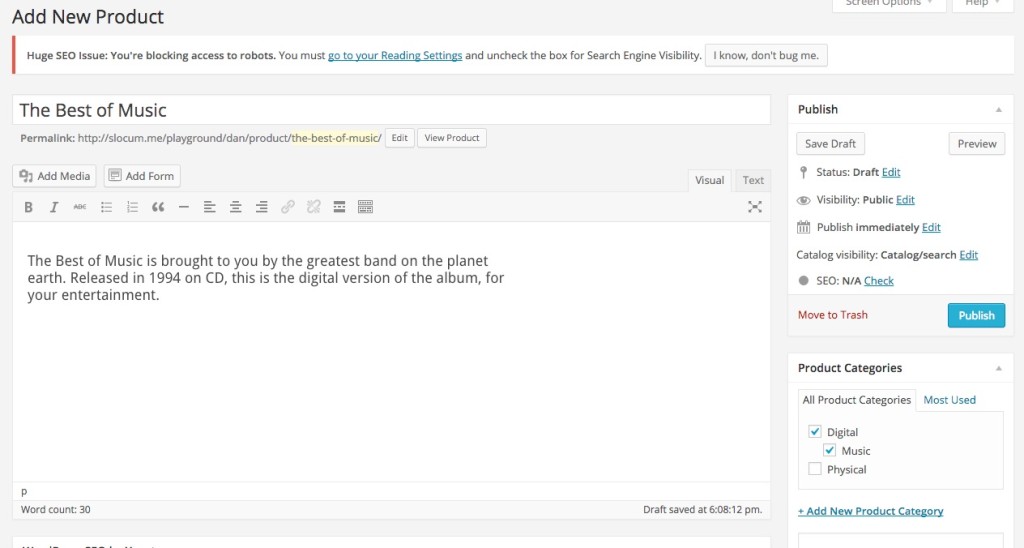
To start, you will go to Products > Add New or view All Products if you are editing an existing product that you have previously created.
Title and SEO Title
Name your product in the main title bar when creating or editing a WooCommerce Product.
We recommend also using a tool like WordPress SEO by Yoast to improve site titles for SEO and Google purposes specifically.
Content and Product Description
You can also add information about your WooCommerce product by using the built in WordPress content editor or the “Product Description” which is specific to WooCommerce and can be found beneath the content editor on the Add New Product page.
What’s the difference between content and product description?
- Content: This is the truly in-depth information that will be displayed underneath the product to the customer
- Product Description: This is the content that appears at the top of the page. It is normally used to define the technical information about the product and provide a brief description.
For more tips about how to write effective product descriptions for both your customer and for Google, please read this more in-depth article here.
Featured Image
You will want to upload a small image to the featured image. Try to make this image as square as possible to fit traditional WooCommerce standards.
There is a window in the product editor to select the featured image.
WooCommerce Product categories and tags
You might also want to consider lumping your product into product categories and tags, which has a technical and organic purpose.
For one adding “tags” are like providing extra keywords on your site to Google. You can find “Tags” underneath the “Product Category” section of the editor and simply type keywords that apply to your product, separated by commas.
Categories allow you to better segment your offerings. If all you sell are colored t-shirts, categories may be a bit much, but if you have multiple offerings to sell, categorization is imperative.
To add a new category you can click on “Add New Category” in the editor. You can make a new parent category or add a new subcategory underneath an existing category.
Add WooCommerce Product categories to the menu
As an aside, a lot of people like to add WooCommerce product categories to their menu, but have no idea how to do it. This is normally due to the fact that WordPress will hide these menu selections by default.
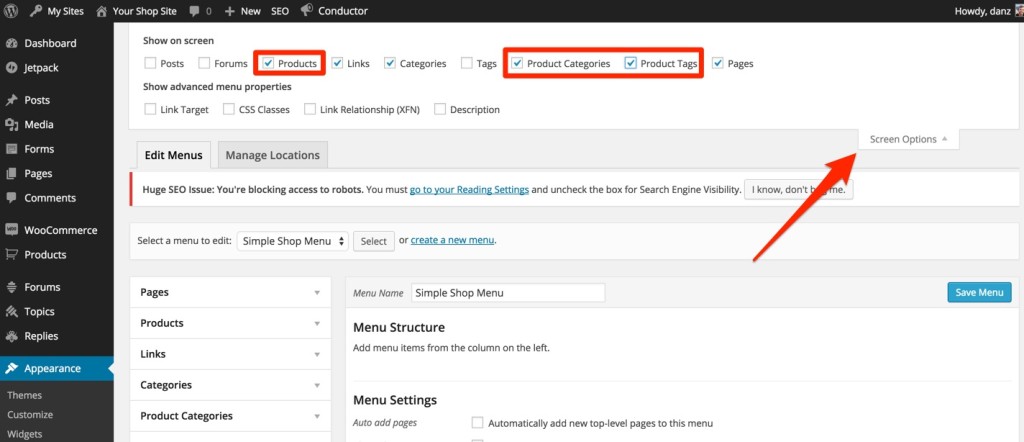
Go to Appearance > Menus and click on the screen options dropdown at the top to enable whatever options you want when creating your WordPress menu. This will add them to the left side of the menu editor so that you can, for example, add your WordPress category.
WooCommerce and WordPress menus supported include:
- Individual Products
- Product Categories
- Product Tags
What type of products am I going to be selling?
Now that we have created the groundwork for our product, we have to fill in the technical details about our product, which requires a bit of thought.
To begin, think about the nature of your product. Is this a physical product you are going to be shipping out to folks, or is it a digital or “downloadable” product?
Did you need to create attributes and terms above to satisfy the needs of your product for your customer? If so, your WooCommerce product is variable. If not, it is what WooCommerce refers to as “Simple”.
As a refresher, a t-shirt that comes in different colors would be classified as a “variable physical” product. An audio CD only available as an MP3 download would be classified as a “simple digital”.
Here is a directory to navigate to the right section of this article:
Creating a simple physical product in WooCommerce
Creating a simple physical product is the easiest type of product to handle with WooCommerce as most of the settings are set to start.
WooCommerce will default to a “simple product”.
In “General” , you will set the price in your currency (managed in WooCommerce Settings), a sale price, and SKU number (if you would like.

By going to “Inventory” you can decide whether or not your product should have a stock limit or not. You can set the amount of stock you have so that WooCommerce can track orders in real time.
If you want to manage a limited inventory, you will want to select the “Enable stock management” box and set the amount of stock you have. — This can be edited at any time as your stock levels change.
Allowing backorders let’s people purchase the product, even when you are out so that you can fulfill the orders later.
Creating a variable physical product in WooCommerce
If you are creating a variable product in WooCommerce, the same concepts from the simple physical product exist. They are simply tackled for each variation you have.
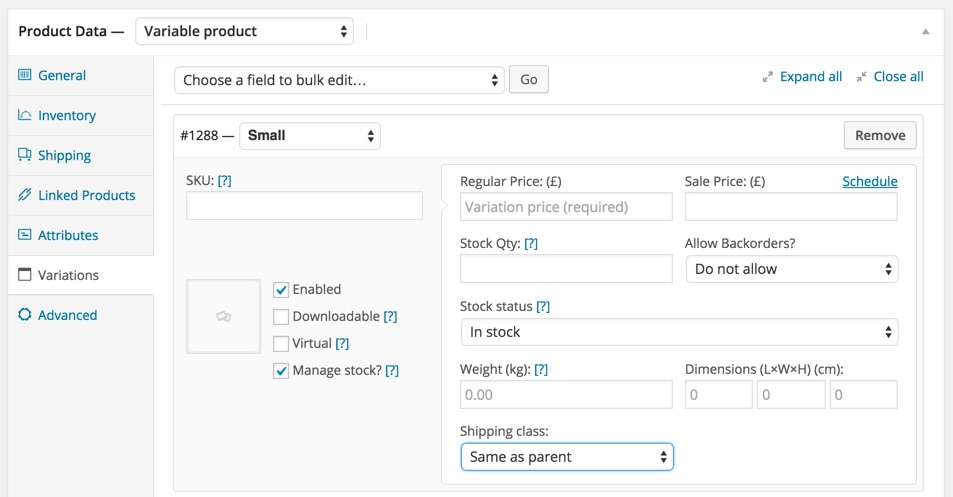
1. Select “Variable Product” from the Product Data dropdown.
2. Go to the Attributes tab on the left and add the attributes from the list of “Attributes” you have created that fit the current product.
3. Select all of the “Terms” within the “Attribute” that apply to this particular product
4. Go to the Variations tab on the left and “Add Variations” for each included Term you selected in the previous step.
5. For each term you select from the dropdown, you will want to click the box to “Enable” it and if necessary click manage stock to manage the individual stock levels of each variation. You might have three red shirts and twenty blue shirts, for example.
Here are the items you can modify for each variation:
- Price of the variation
- Sale price
- Stock quantity
- Backorder preference
- Stock status
- Image of product (if each item looks different)
- Shipping class (some items may be bigger or more fragile than others)
Creating a simple digital product in WooCommerce
To create a digital product, you have to remember that stock doesn’t exist anymore. You are giving a digital file, which will be infinitely downloadable.
From the top of the product editor, “Product Data” you need to select the “Downloadable” checkbox.
When you do this, you will be presented with more options in the “General” tab.
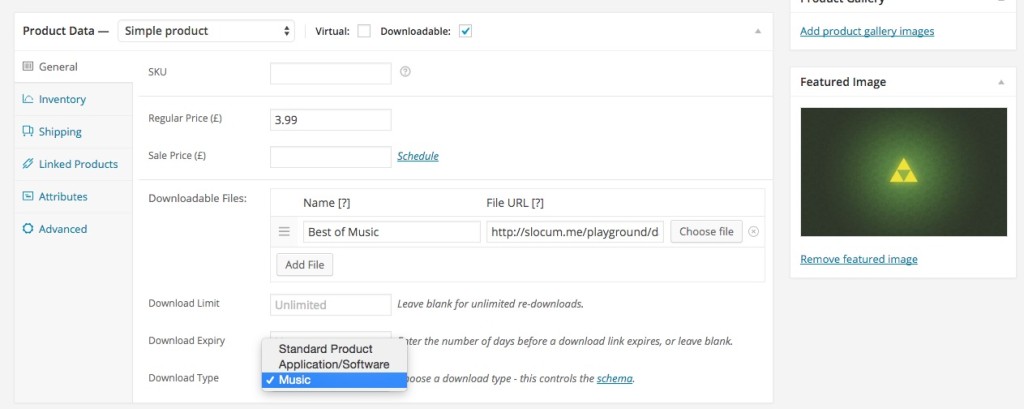
You can upload your file right in the Downloadable Files section. If there are two or more files included, make sure you include them by clicking on “Add File” for each additional file.
If the file is too large for your WordPress install, you might have it somewhere else like Amazon S3 or another cloud storage provider. You can simply paste the link to where the file lives elsewhere into the Downloadable Files — File URL field.
Once you have uploaded this, you can select different options for the product schema, which is helpful for Google search engines as it provides rich information about the product.
Creating a variable digital product in WooCommerce
Much like creating variable physical product, creating digital product starts with selecting “Variable Product” from the Product Data section and selecting the applicable attributes / terms.
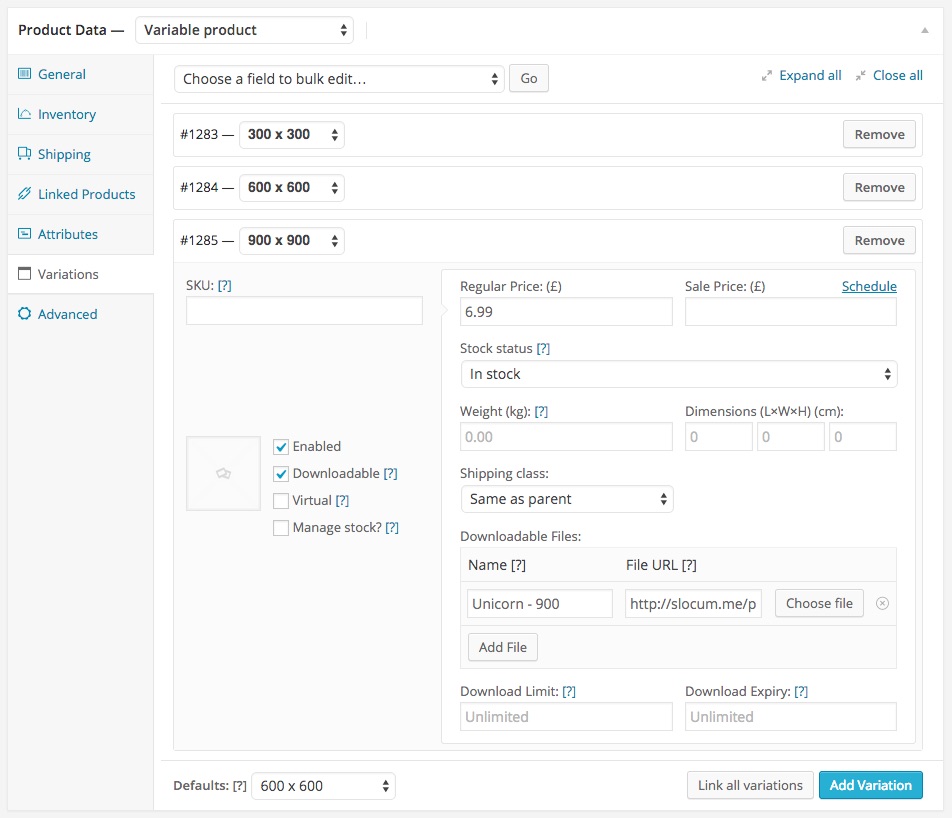
Once you have moved to Variations, you will want to select the checkboxes for “Enabled” and “Downloadable” for each individual variation.
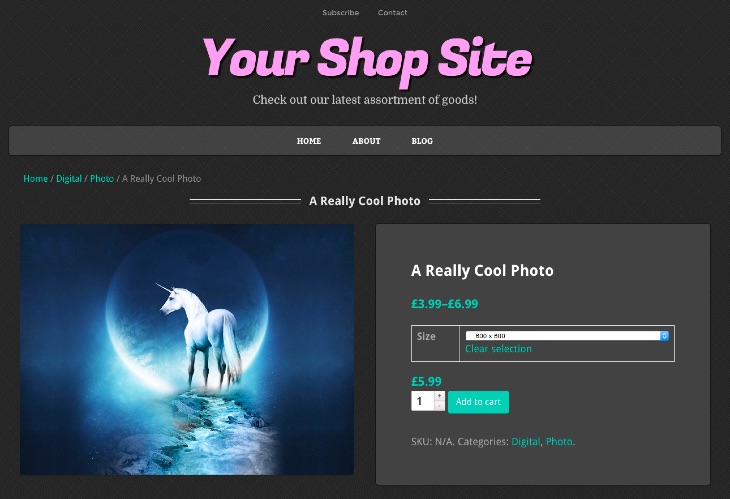
Also similar to physical variations, you will be able to individually set the featured image, price, and sale price from inside each variation.
Displaying WooCommerce Products on the Front Page
Now that we have created the products, we will want to display them on our site. While we have an article that goes over the more technical way to do this in more detail using shortcodes, we still want to cover how WooCommerce flows with its display widgets.
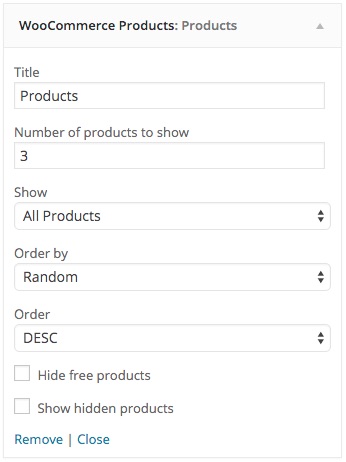
Hopefully, your WordPress theme has areas on the front page or on certain pages to display product using WooCommerce widgets. Many of the most popular theme shops will offer themes with Front Page widget areas to place WooCommerce widgets.
WooCommerce comes with a widget for displaying products called WooCommerce Products. Using this widget, you can display your products in many different ways and tweak:
- How many products are displayed
- What category they are from
- In what order they are displayed
- And more!
Using our theme as an example, you can drag a WooCommerce Products widget into the “Front Page” widget area under Appearance > Widgets to add product display to your front page.
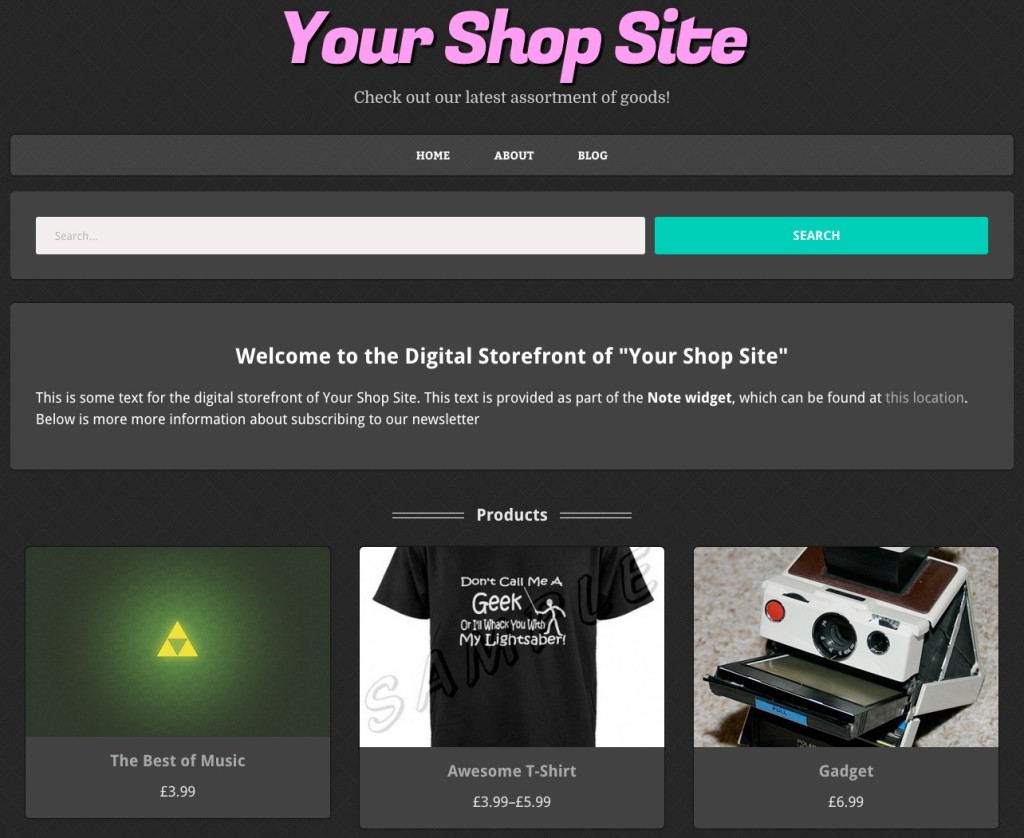
The above image is an example of a WooCommerce product widget display from the front page on our Simple Shop WordPress theme.
Adding products to WooCommerce
That’s a wrap on the tutorial for setting up physical and digital products on WooCommerce. If you have any additional questions or know of any other product types that you need help creating, please let us know in the comments below.
We hope that you enjoy our content. If you decide to make a purchase after clicking on one of our affiliate links, we’ll earn a small commission at no extra cost to you. Thanks for reading! View our Affiliate Disclosure

