
A slider is a professional and aesthetically appealing tool to display a group of images, videos, or posts. Soliloquy allows you to display images in the form of a slider; SlideDeck 2 allows you to display posts, videos, etc. in the form of a slider as well.
Using the Soliloquy Plugin
Installing Soliloquy
1. From the WordPress Dashboard, navigate to Plugins > Add New
2. Search for Soliloquy lite and hover over Responsive WordPress Slider – Soliloquy Lite
3. Click Install Now and Activate Plugin on the following page
Soliloquy Lite vs Pro
While Soliloquy Lite may suit your needs, Soliloquy Pro comes packaged with a plethora of great features and functionality, including:
- Native video support (Youtube, Vimeo, etc.)
- A large selection of add-ons to further improve functionality
- Import/Export sliders
- Rock solid support
- Mobile responsiveness
- Ability to create an unlimited number of sliders
- And much, much more!
On top of all that, Soliloquy Pro also offers a 14-day money-back guarantee, so there’s really no reason not to try it!
Configuring Soliloquy
1. From the WordPress Dashboard, navigate to Soliloquy > Add New
2. Enter a title and, in the Images tab, select the images you want in the slider
3. Select the Config tab
Here, you can configure the slider to fit your needs. The lite version of Soliloquy allows you to change the slider theme, dimensions, the transition speed and duration, and the slider gutter.
4. Select the Misc. tab
The contents of the Misc. tab allows you to add an internal title, slug, and custom CSS classes for the slider.
5. Select Publish
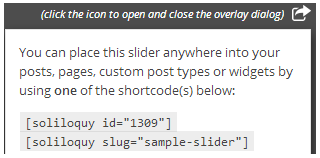
6. You will be presented with two “shortcodes” for your new slider. Simply enter either one of these into a post, page, or widget to display your slider.
Adding your Slider as a Widget Using the Widgets Subpanel
Note: Soliloquy Pro comes pre-packaged with a widget made tailored for displaying sliders. We suggest you use that instead of this method.
1. From the WordPress Dashboard, navigate to Appearance > Widgets
2. Find the Text widget and drag that to the space you want the slider to appear in
Note: Modern Business has a space specifically for a front page slider (only visible if you have a static front page set)
3. Enter either of the two “shortcodes” in the content text box
4. Click Save
Adding your Slider as a Widget Using the Customizer
1. From the WordPress Dashboard, navigate to Appearance > Customize
2. In the left sidebar select the Widgets option
3. Select whichever area you’d like your widget to be in
4. Click on the button labeled Add a Widget and add the Text widget
Note: Modern Business has a space specifically for a front page slider (only visible if you have a static front page set)
5. Enter either of the two “shortcodes” in the content text box
6. Click Save & Publish in the top-right corner of the sidebar
Using the SlideDeck 2 Plugin
Installing SlideDeck 2
1. From the WordPress Dashboard, navigate to Plugins > Add New
2. Search for Slidedeck 2 and hover over SlideDeck 2 Lite Responsive Content Slider
3. Click Install Now and Activate Plugin on the following page
Configuring SlideDeck 2
1. From the WordPress Dashboard, navigate to SlideDeck 2 > Create New SlideDeck
2. Select a source for your slider
3. The Lenses tab allows you to quickly and easily change the appearance of your slider
4. The Setup tab allows you to change the size, number of slides, and overlay options of your slider
5. The Appearance tab provides more in-depth customization options for the appearance of your slider
6. The Content, Navigation, and Playback tabs allow you to control the slide content, slide navigation, and slider playback options, respectively
7. Select Save SlideDeck at the bottom of the page
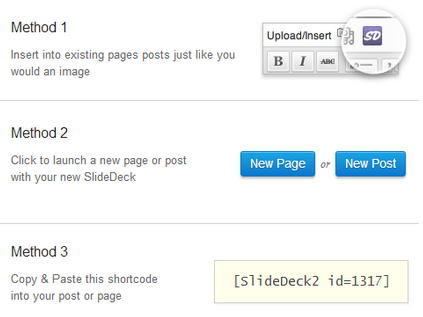
8. You will be presented with three ways to publish your new SlideDeck. You may:
a. Insert the SlideDeck directly into a post or page, just like you would with an image
b. Create a new post or page with the SlideDeck by following one of the two links provided
c. Insert the provided “shortcode” into a post or page
Adding your SlideDeck as a Widget Using the WIdgets Subpanel
1. From the WordPress Dashboard, navigate to Appearance > Widgets
2. Select the SlideDeck 2 widget and select where you want the widget to appear
Note: Modern Business has a space specifically for a front page slider (only visible if you have a static front page set)
3. Choose a SlideDeck from the dropdown box
4. Add a title/intro text/footer text as you see fit
5. Click Save
Adding your SlideDeck as a Widget Using the Customizer
1. From the WordPress Dashboard, navigate to Appearance > Customize
2. In the left sidebar select the Widgets option
3. Select the area where you’d like your SlideDeck 2 widget to appear
4. Click on the Add a Widget button
5. When the menu pops up select the SlideDeck 2 widget
Note: Modern Business has a space specifically for a front page slider (only visible if you have a static front page set)
6. Choose a SlideDeck from the dropdown box
7. Add a title/intro text/footer text as you see fit
8. Click Save & Publish in the top-right corner of the sidebar