
Built right into the functionality of our clean and elegant themes in the theme options panel is a section to create a one-click child theme that is easy to manage.
It’s very important to setup a child theme if you plan on making ANY edits to your core Modern Business Theme.
Why would you make a child theme?
- Edit syle.css to change colors or font sizes
- Modify hooks and action filters via functions.php
- Create new page template files
- Other stuff we haven’t thought of!
If you make these changes to your theme directly (the parent theme) and we release a new version to the theme (which we do often) you might lose all of your changes. Read more in our article about Child Themes.
Here are the steps
1. Download the Slocum Studio One-click child theme plugin.
2. Install the plugin by browsing to Plugins > Add new > Upload and select the .ZIP you downloaded.
3. Activate the plugin after installing.
4. Browse to Appearances > Theme Options > Child theme
5. Activate your child theme, see image below.
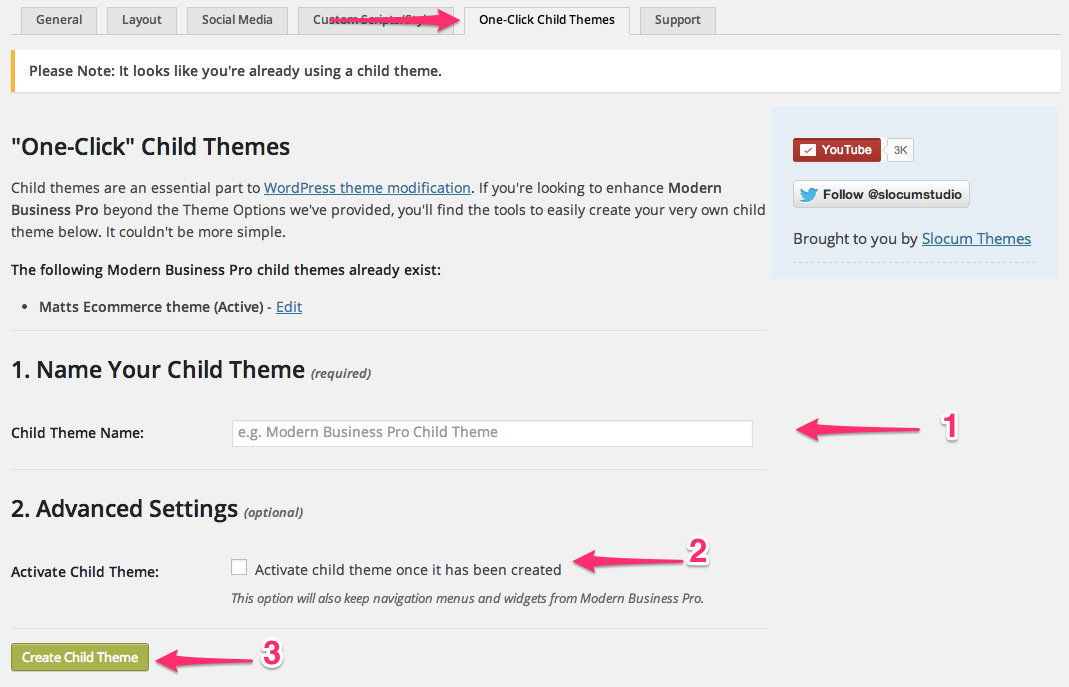
- One-click Child theme setup
You can name your theme anything you want and then check off “Activate child theme once created.” This will take care of making a folder and all necessary files on your site, no heavy lifting from you!
Once you click on the button to create the child theme, you will notice by going to the Appearance > Themes page that the new current theme is the child theme and the parent theme is somewhere else on the themes page.
How to edit the child theme
Editing the child theme is equally as easy, it just requires some working knowledge of CSS or PHP.
The most obvious thing people will want to change are colors and font sizes.
What you want to do is follow this process:
1. Go to the editor found under “Appearance > Editor”
2. Navigate to the parent theme option on the top right of the editor.
(In the case of our example the parent theme we want to select is Epic Pro)
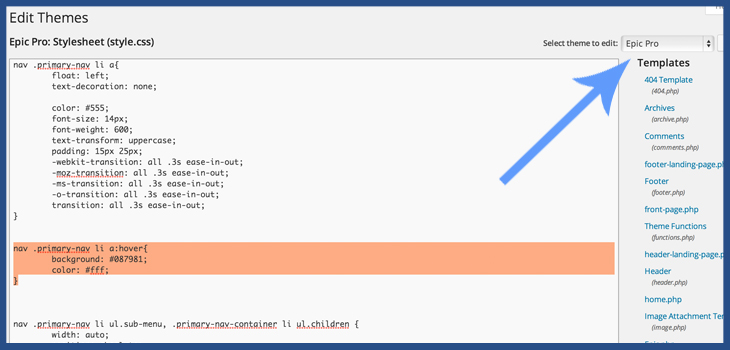
3. Highlight and copy the piece of CSS or PHP that you want to edit (as shown above)
4. Go to the top right drop down menu and select your child theme and hit the “Select” button.
5. Once the child theme editor opens up (it will look a LOT more barren), paste the code into open, empty space.

6. Make the change you want to make or add the style you want to add
7. Make sure to click “Update file” on the bottom of the editor to make the changes to the child theme.
That’s it! You have officially created and edited a child theme on WordPress.
Now you can update your themes while editing elements like style and color!
Warning!
Make absolutely sure that you are not removing anything or editing any of the CSS or PHP in the sheets under the parent theme in the Editor.
Removing content from the parent theme will potentially move functionality from the theme that was in place before you removed it.
Colors, font sizes, or other items changed on the WordPress parent theme (In our example, Epic Pro) will be reverted back to normal when the theme is updated again, which can also cause problems.
If you think you have made an error, simply DO NOT CLICK the “Update File” button and go back or click to another page to revert the theme to the way it was.
Help I am not allowed to edit my files in the WordPress Editor!
If you find that you do not have the option to save your changes made to the child theme or do not have permissions, you will have to modify your access permissions in “htaccess” or notify the site administrator.
Video Walkthrough
For additional support, here is a video walkthrough that goes through the process of how to create a child theme in WordPress using our one-click child theme option: