You want your WordPress website to go fast, and you have heard that the Content Delivery Network (CDN) is the way to go.
After all, they take your website, distribute it across many servers, and allow your content to be delivered in shorter time and with fewer technical hiccups.
If you are serious about speeding up the page load of your WordPress website and your client’s, find out why to choose MaxCDN and how to set it up on a WordPress website.
How does MaxCDN work?
MaxCDN is a Content Delivery Network (CDN) for the business website. With a focus on websites with high volume or maximum speed in mind, the CDN is perfect.
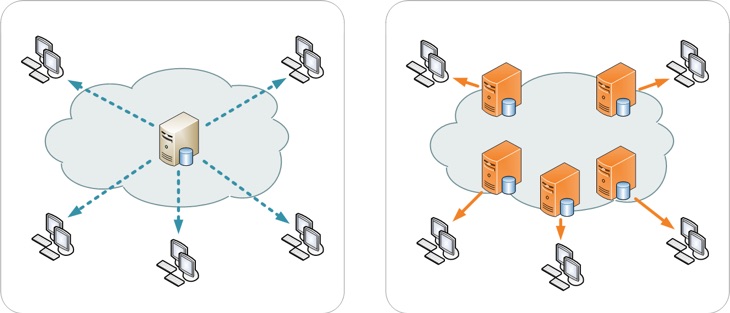
We don’t want to spend a lot of time on the hows and whys of the content delivery network — you can reference that resource here. In short, MaxCDN:
Loads your web content through their servers, which…
Improves load speed of content and images
Protects your content load in the event of an attack or high traffic
Improves load speeds in other areas of the world (using more than just your server, in one part of the world)
For everyone from international conglomerates to a pizza delivery company, having the boost in speed is a definite benefit.
The MaxCDN advantage
With MaxCDN specifically, you are getting access to one of the most popular content delivery networks with a wider range of server locations (MaxCDN has servers in North America, Europe, Hong Kong, Singapore, Sydney, Israel and Tokyo) and variable pricing.
It also integrates very easily with WordPress as you are about to discover.
Note: It’s also worth mentioning that MaxCDN works on more than just WordPress themes and websites. That being said, this article is focused on setting up MaxCDN with WordPress, so we will stick to the plan.
How to set up MaxCDN on a WordPress website
Now that you have a better understanding of what MaxCDN does and how it works, it is time to set up MaxCDN on a WordPress website. Follow this simple three step process to do so:
1. Purchase and set up MaxCDN
You first must create an account with MaxCDN and select a plan that best meets the needs of your business.
Submit your site for an application and then get login access to the website. Once you have logged in to your account and selected a plan you will want to create a pull zone.
Create a Pull Zone in MaxCDN
To create a pull zone, you will want to go to the section in your navigation bar titled “Zone” and create a New Pull Zone.
Zones > Pull Zones > Add Pull Zone
Name your zone whatever you would like and then add the origin server. This needs to be 10 lowercase letters or less. We might use: sthemes as our Zone Name.
The Origin Server is simply the URL for your website. In our case, this would be https://slocumthemes.com
Enter the label, which is whatever you would like it to be.
You will most likely want to enable compression as it does help to speed up and optimize the code on your WordPress website.
Click Create
Copy the CDN URL (you will need this for a later step)
2. Download and Install W3 Total Cache
W3 Total Cache is a separate plugin with strong ties to MaxCDN. The purpose of W3 Total Cache is to cache data on the website. It has easy integration with MaxCDN.
Download W3 Total Cache from the WordPress repo and install and activate it on your site.
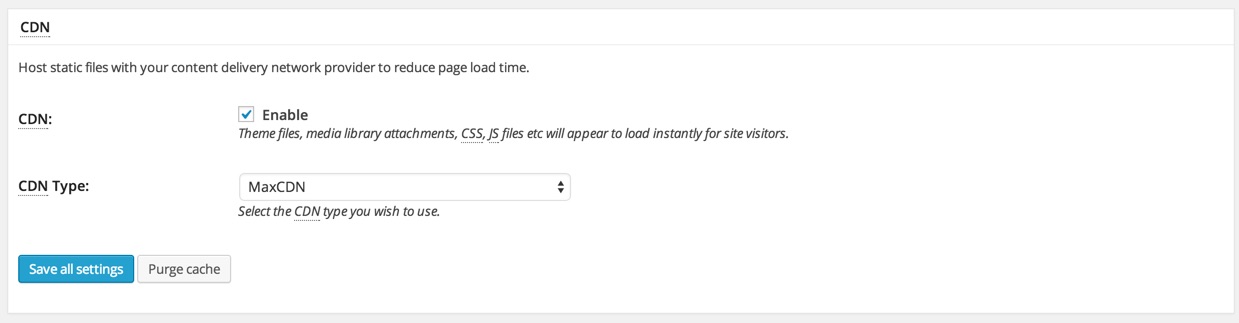
Once activated, you will want to go to the General Settings of W3 Total Cache and check the box to enable the CDN. Select “MaxCDN” as your option of choice.
3. Connect MaxCDN and W3 Total Cache
Now you need to attach your MaxCDN account to your existing WordPress website using W3 Total cache settings.
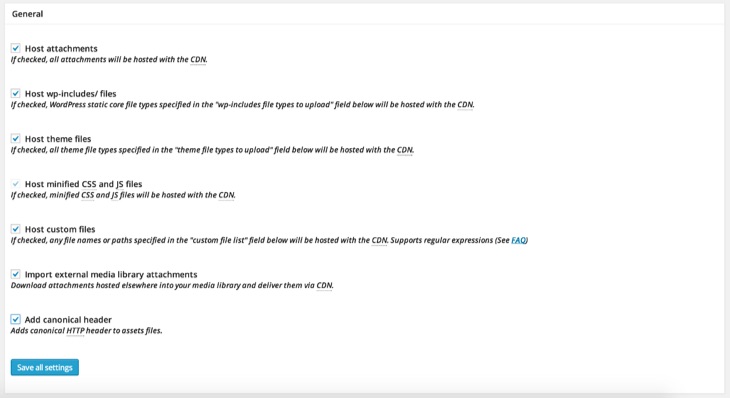
Go to the “Performance” sidebar on your site (which ties in to W3 Total Cache plugin) and go to the CDN settings area. The first block you will notice is the general settings block. In this section, we simply check all of the boxes. If you are unsure, you can contact your server host.
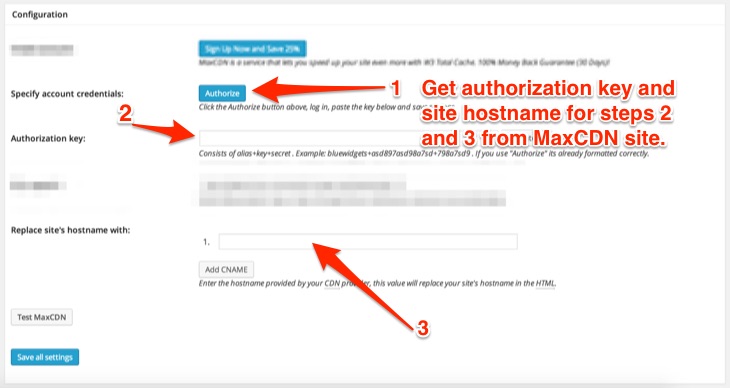
Now that you have finished with the General settings block, it is time to move to the Configuration block on the CDN settings area.
The first thing you want to do is click the “Authorize” button to create a key on your MaxCDN account. You will be redirected to the MaxCDN website and to your profile.
Copy the key from the MaxCDN website and paste it into the field titled “Authorization key” under that Configuration block.
Remember that “CDN URL” that we previously discussed? You are going to want to paste that URL in the “Replace site’s hostname with:” field in the Configuration block.
From here, you can test the connection and then save the settings.
You are set!
With that final save finished, your WordPress website will be connected with your new MaxCDN account! Your site should be faster than ever before locally and across the world.
If you have questions, or if the site is not working properly, please let us know in the comments or below or drop us a line.
We hope that you enjoy our content. If you decide to make a purchase after clicking on one of our affiliate links, we’ll earn a small commission at no extra cost to you. Thanks for reading! View our Affiliate Disclosure
2 thoughts on “How to set up MaxCDN on a WordPress website”

Nice. Clear instructions.
Pingback: The 6 Six Places You Should Spend Money on Your Website Upfront