Digital marketers will often speak to the power of a good email campaign.
After all, PR is becoming a much greater focus on the modern market than traditional advertising.
When was the last time you saw an effective banner ad??
Getting personal and reinforcing the power and benefits of the brand on a personal level are achieved through reaching out to an audience. Simply telling you a product is good on the television will not do much good.
This article will show you how to go about adding an subscribe newsletter call to action on your website, gravity forms integration, how to tie it to an existing subscription account, and how to easily style any of our themes to make the subscribe box look like YOUR site.
Overview of this resource
The ultimate (and easiest) solution is to create a WordPress newsletter is a combination of the Gravity Forms plugin, the Mailchimp email marketing software, and our Slocum Themes.
Navigate the table of contents below to go to the proper place:
The first step in creating a WordPress newsletter form on the site is to get a plugin that does the trick.
We highly recommend the premium plugin Gravity Forms, since it is easy to use and integrates with many email campaign softwares through add-ons, like MailChimp (our personal favorite) and Constant Contact.
Gravity Forms also taps into the code with our Slocum Themes, making it easier than ever to create a nice looking subscribe box.
At time of posting, in order to get the most out of your campaigns and MailChimp, you will need to purchase at the very least the business version of the Gravity Forms plugin to get access add-ons imperative to setting up accounts like MailChimp.
Set up the WordPress Newsletter with Gravity Forms
To set up Gravity Forms, you must first install the plugin like any other WordPress plugin — via the plugins section or via the FTP depending on your install. Once activated, there is a multi-step yet easy process for creating the newsletter subscribe form.
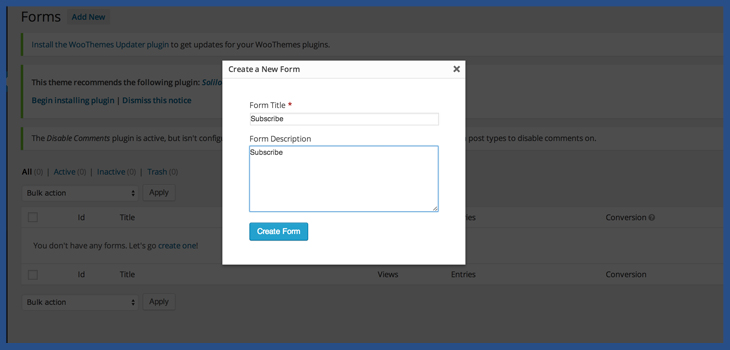
1. Create a new WordPress newsletter form by going to Forms > New Form
2. Once you have clicked, put your bold title where it says “Form Title”. This could be something like “Subscribe” or “Join”.
3. In the form description section, write the sentence that you would like to get people to take action and enter their email. Now you can click “Create Form”.
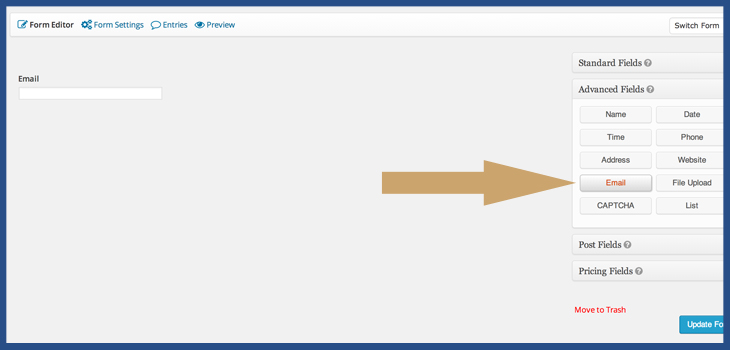
4. Once on the form editor page, go to the Advanced Fields dropdown and select “Email”.
5. If you want to capture more than just the email, you might also consider adding other forms entry boxes like Name or Phone. Typically people do not want to be bogged down by too many entry fields, so just leaving an email form is usually recommended. It leaves less room for personalization down the road but more importantly makes it more accessible for people to join in the first place.
6. Click “Update Form” and voila! You now have a perfectly functioning Gravity Form for newsletter subscribers.
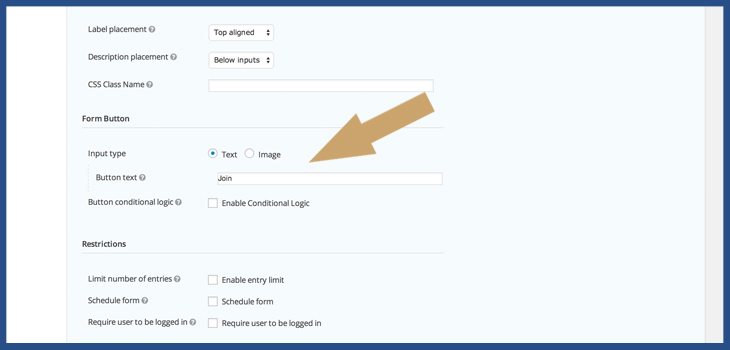
7. You will consider going to the form settings section to adjust what the button will read by going to the “Form Button” section.
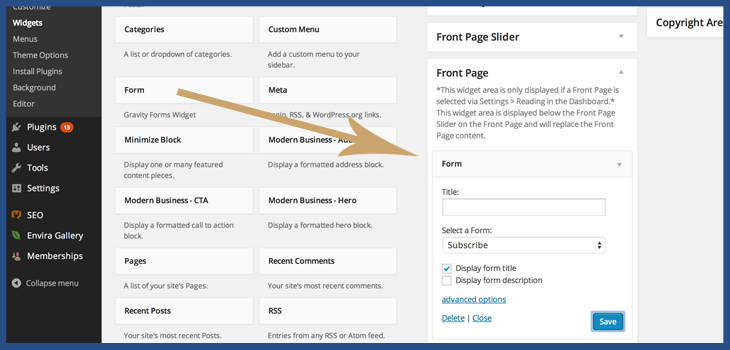
8. To place the subscribe form in a major content area, you can tap into the Widgets you get from Gravity Forms and place your new form in any major Widget Area on your website. If you are using our themes, try using the “Front Page” widget area exclusive to our themes to place a gigantic subscribe form on your front page.
How to set up MailChimp with Gravity Forms
To set up Mailchimp to work with Gravity Forms, you first of course need to have an account on MailChimp. If you need help setting up a proper MailChimp account, contact us for assistance.
Once you have created your account with MailChimp, you will want to activate the Add-On for Gravity Forms to allow for integration into MailChimp. Again, this is where the purchase of a Business or Developer license comes into play.
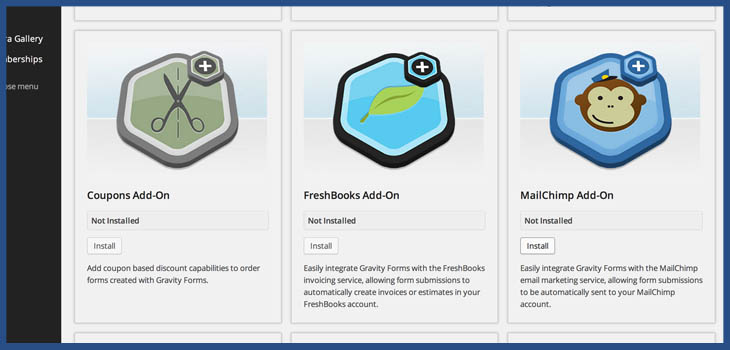
1. Install the MailChimp for Gravity Forms plugin by going to Forms > Add-Ons and finding the MailChimp add-on. Click the install button and activate the plugin once installed.
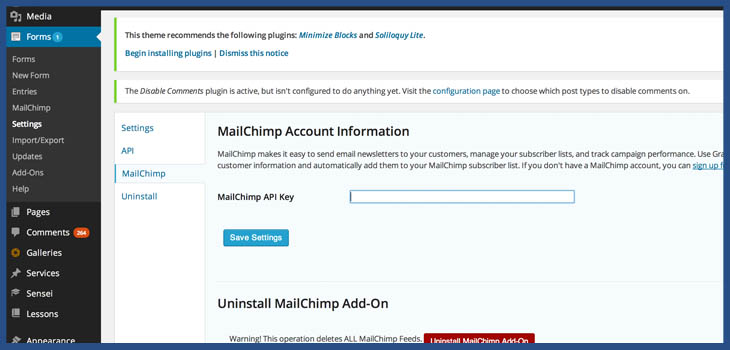
2. Now you need to generate an API key from MailChimp, which you can easily do by going to the Account Settings of MailChimp and then Extras > API Keys.
3. Now that the API key has been generated, you want to go to the Gravity Forms Settings > and then the MailChimp section and enter that generated API key.
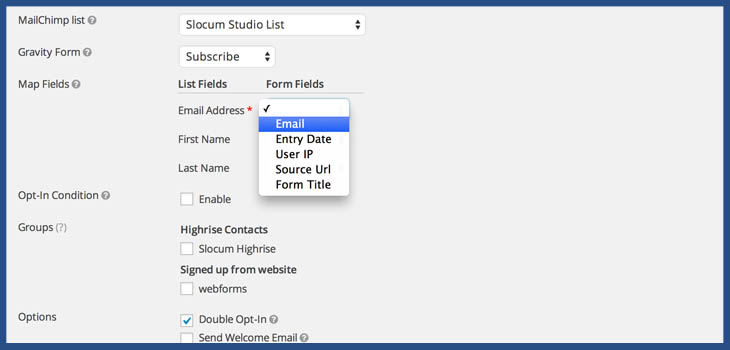
4. Now, you can configure an MailChimp feed by going to the Forms > MailChimp section and creating a feed. You will select the MailChimp list that you want subscribers to be funneled to once they subscribe. Also, select the form that you want to target (this will be the Gravity Form that you created).
5. In the feed, all you need to do is designate the proper fields that you want to associate with the list on MailChimp. If it is just an email subscribe, it would simply be the email entered on Gravity Forms being added as an email on the MailChimp list.
Now you’re done implementing the form! Time to make it look pretty.
Styling Gravity Forms to look like the your site
Here comes the best part of this whole experiment — getting your WordPress newsletter subscribe form to look like the rest of your website.
With our Slocum Themes, we have created the option to easily make your subscribe form look like the coloring and styling of the rest of your website! Take a look at the below gravity form, for example!
The only WordPress newsletter you need
Join 1000's of fans and customers just like you. Always awesome and never spam.
There is only one step to be taken to get this to work!
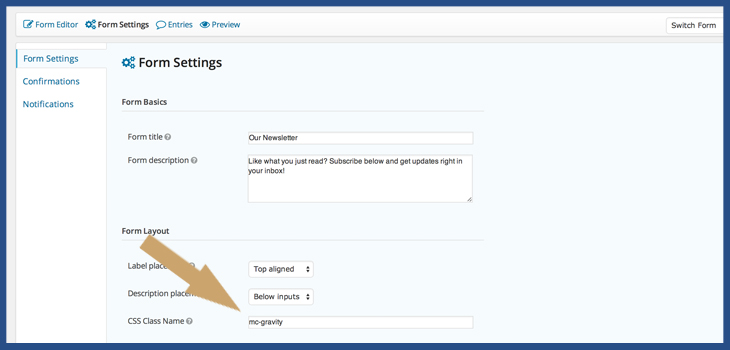
With one of our themes (listed below) installed, simply go to the Form Settings of the Subscribe form (or any Gravity Form for that matter) and under Form Layout, write mc-gravity in the field for “CSS Class Name”. Make sure you save your changes.
Doing this will get your WordPress newsletter to mimic the color and text of the rest of your website, even if you change the styling of site down the road!
Change the base color of your theme or the title fonts? No problem, the forms will automatically function. You can also watch the video at the bottom of this post to get a demonstration of how this works.
WordPress Themes that work with this Gravity Forms styling
Here is a video walkthrough to make your subscribe form carry over the look and feel of your website.
Check out our WordPress themes here or contact us with any questions.
We hope that you enjoy our content. If you decide to make a purchase after clicking on one of our affiliate links, we’ll earn a small commission at no extra cost to you. Thanks for reading! View our Affiliate Disclosure